


In this tutorial, we're going to create an Airtable script that goes through all of your records and analyzes the images in attachment fields. With this info, the image automation workflow will generate creatives using the Placid templates that best fit your image sizes.
This is quite an advanced workflow, so we'll assume you're familiar with the basics of the Placid Airtable integration and have an account for both tools.
If you're just starting out and want to learn more first, sign up for free and get familiar with the setup. You might want to check out:
- This tutorial on how to auto-generate social media graphics from templates with Airtable + Placid
- This guide on how to use filter rules in Placid actions
- This tutorial explaining how to use filters in an example workflow with Airtable.
Video Tutorial
Starting Point
We're starting with an existing automation setup that provides everything we need to explore our different automation configurations.
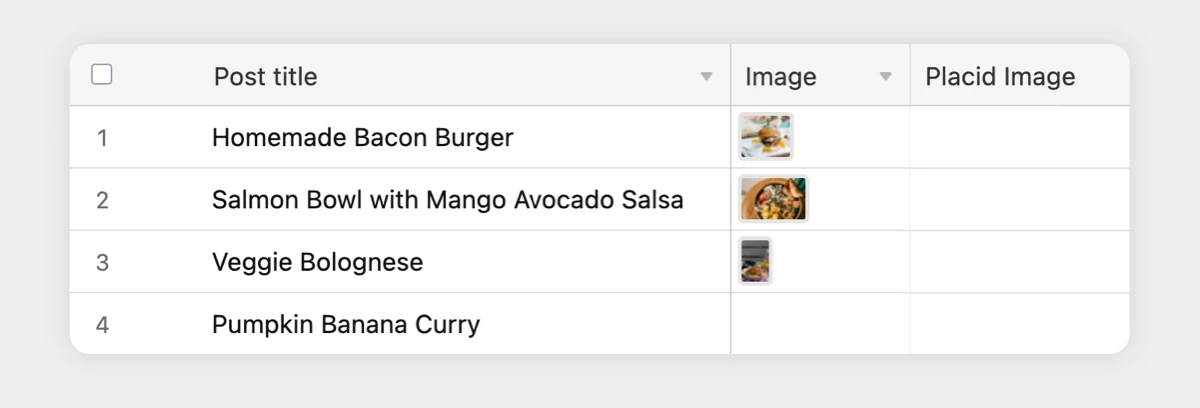
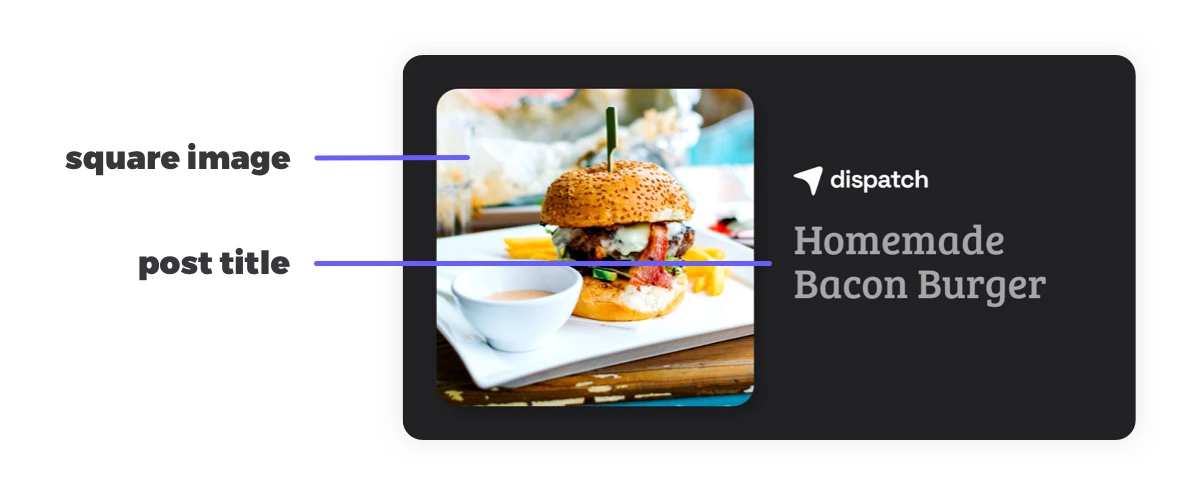
I set up an Airtable with 3 fields for a post title (text), an image (attachment) and a Placid image (attachment). I filled the title and image fields with example data, making sure that I used images with different aspect ratios. (This helps us test all our settings later.)
In the end I have 4 records: One has a square image, one has a landscape / horizontal image, one has a portrait / vertical image and has no image at all.
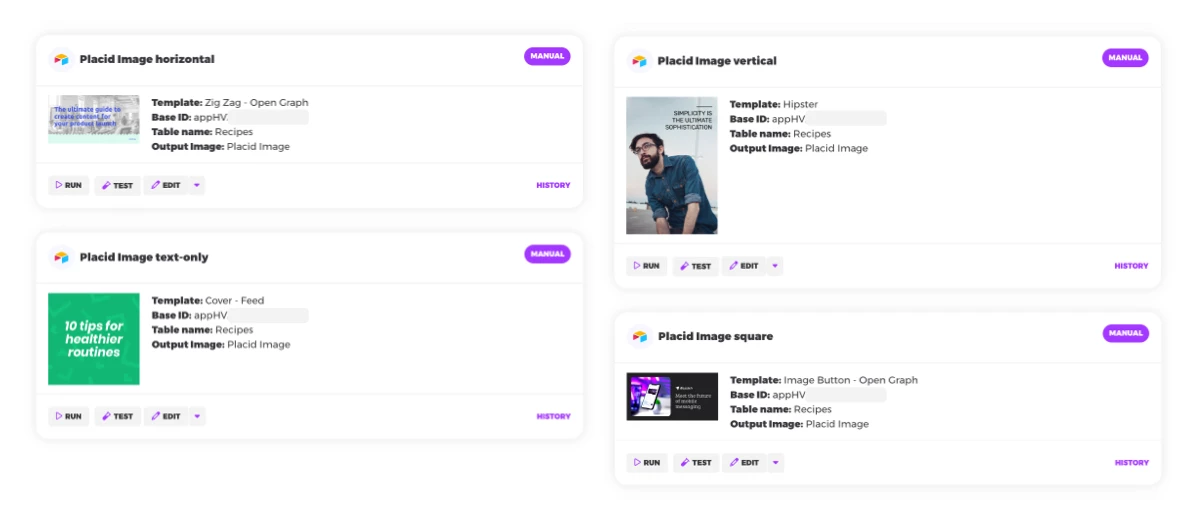
This data is already connected to Placid to generate creatives from 4 templates using 4 different Placid actions. Each of them is designed for different image proportions. (I used preset designs from our collection, but you can design your own, of course.)

Every one of my 4 actions are configured to generate creatives using the data from the post title and image fields, and send them back to the Placid image field. This happens whenever I run the action (manually).
What we're going to build
In our base setup, every action generates visuals for all of our records. There's no differentiation between records that hava an image, and those who do not. There's also no consideration of different image sizes. This would result in images being cut off unflatteringly, and unnecessary images being generated.
So we're going to do some scripting and configuration:
- In Airtable, we'll add a script that calculates the image's orientation & aspect ratio, and writes these metadata into additional Airtable fields.
- In Placid, we're going to add filters to our actions. In the end, they will only generate visuals when they find images that fit the proportions / orientation used in the template design.
Calculate proportions of Airtable images
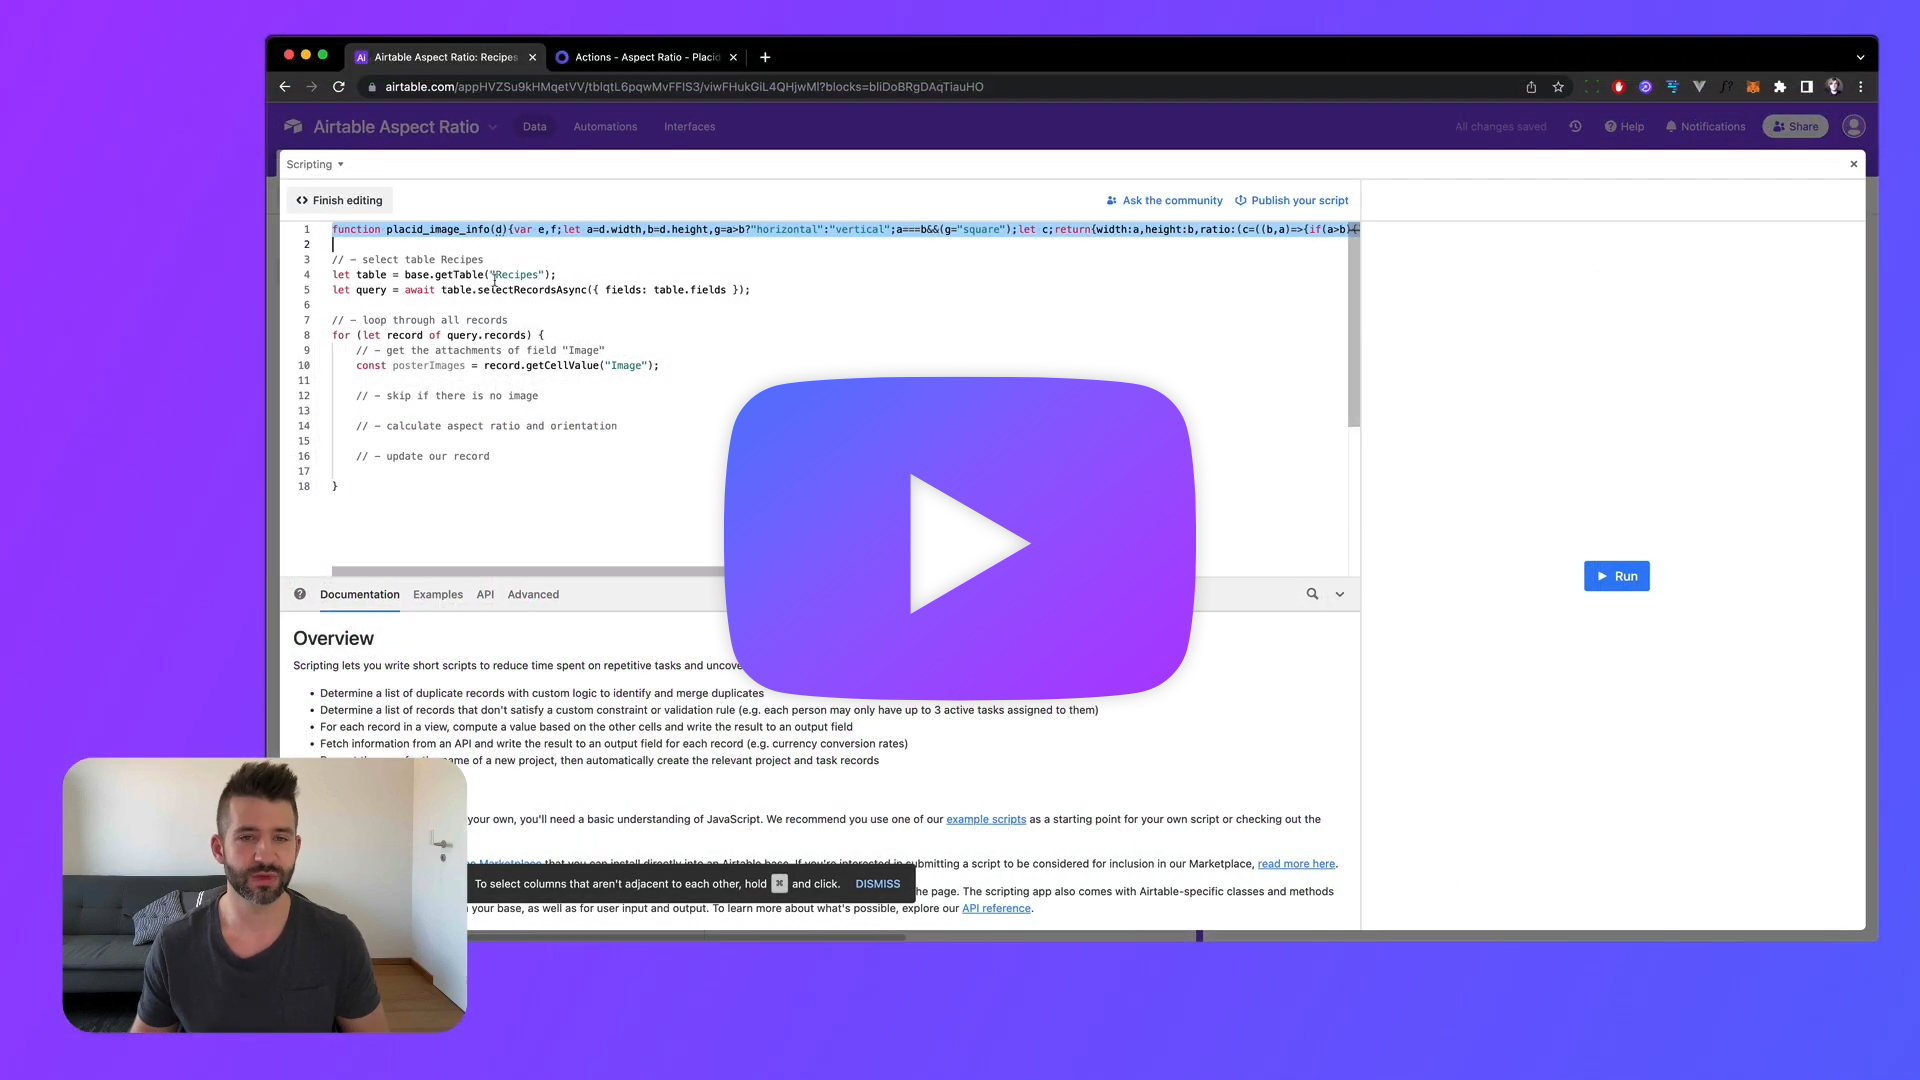
To start with our script, we will first add an extension to our table:
- Open the Extensions panel in Airtable
- Add an extension and choose a scripting block
- Delete the Hello world example code so you have an empty script


Then we'll add our own code. I have prepared a ready-to-use function that delivers two values for any image that you pass to it: Orientation (square / horizontal / vertical) and aspect ratio (e.g. 16:9, 1:1).
Copy and paste it into your script editor.
// - function to calculate orientation and aspect ratio
function placid_image_info(d){var e,f;let a=d.width,b=d.height,g=a>b?"horizontal":"vertical";a===b&&(g="square");let c;return{width:a,height:b,ratio:(c=((b,a)=>{if(a>b){let c=b;b=a,a=c}for(;0!=a;){let d=b%a;b=a,a=d}return b})(e=a,f=b),""+e/c+":"+f/c),orientation:g}}
Output image metadata to Airtable fields
Now we'll script a routine that goes through all of our records, calculates the image information for all records using this function, and writes it back into our table.
To do that, we'll first have to add two fields (text) to our table: Orientation and Aspect Ratio.
Then, we'll add this to our script:
// - select table
let table = base.getTable("tableName");
let query = await table.selectRecordsAsync({ fields: table.fields });

// - loop through all records
for (let record of query.records) {

    // - get the attachments of field "Image"
    const sourceImages = record.getCellValue("Image");

    // - skip if there is no image
    if(!sourceImages){
        output.text('Image skipped')
        continue;
    }

    // - calculate aspect ratio and orientation
    let placidImageInfo = placid_image_info(sourceImages[0])

    output.table(placidImageInfo)

    // - update our record with image metadata
    table.updateRecordAsync(record.id,{
        Orientation:placidImageInfo.orientation,
        "Aspect Ratio":placidImageInfo.ratio
    })
}
Be sure to adapt the table ("tableName") and field names ("Image", "Orientation", "Aspect Ratio") according to your actual table!
Add filters to our Placid actions
We'll now edit our actions one by one to filter for the image orientation they're designed to support.
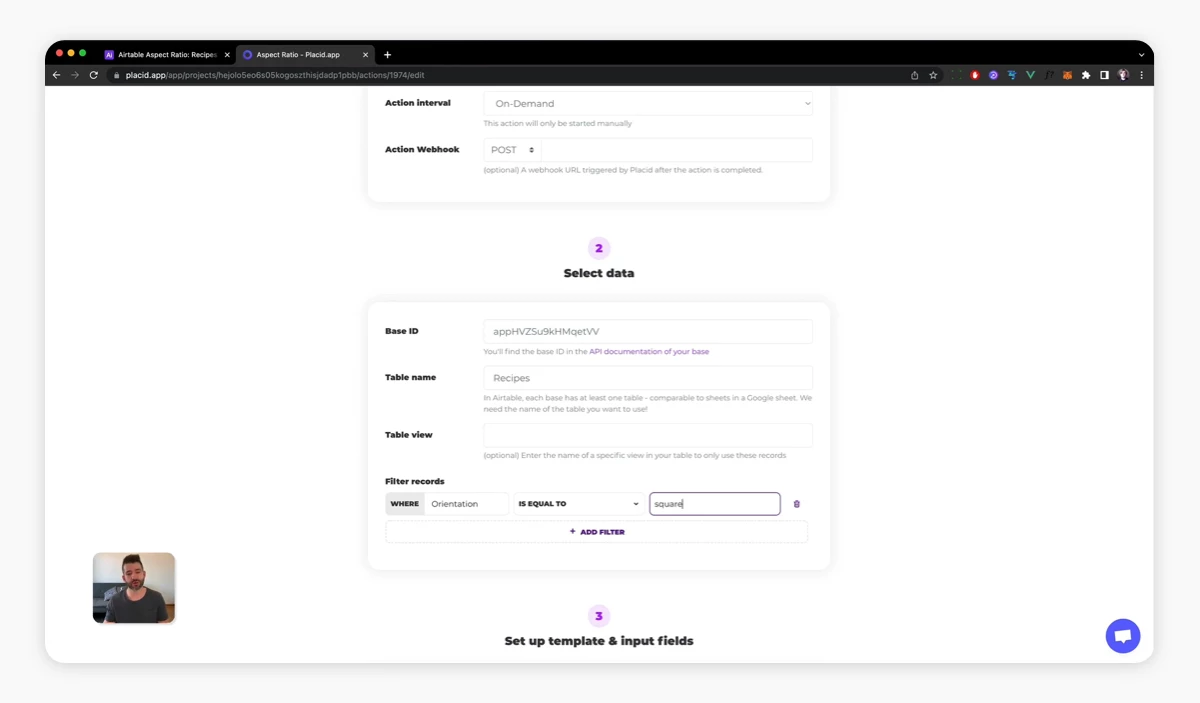
In the Actions menu in Placid, click edit on one of your actions and go to Step 2 - Select data of the form. Here, you can add a filter:
- WHERE Orientation IS EQUAL TO square|horizontal|vertical
- WHERE Orientation IS EMPTY (for records without an image)
Configure all of your actions depending on which image dimension fits the respective template best. After this step, I have:
- One action that filters for a horizontal image (Template 1)
- One action that filters for records with no image (Template 2)
- One action that filters for a vertical image (Template 3)
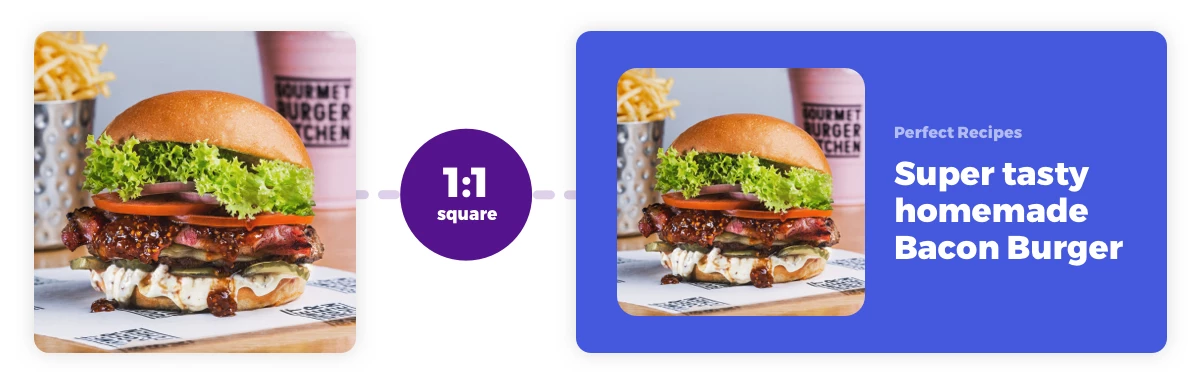
- One action that filters for a square image (Template 4)
Start all Placid actions via script
To make our workflow more convenient, we'll add an Airtable script that starts all Placid actions of our project when we hit the Run button of our extension. Our action will first calculate the image information, and then proceed to generate all the images in one go.
You can find a customized version of this script in your project settings in the Airtable tag. It will include your own project token, and looks like this:
// - run all Placid actions
const response = await fetch('https://api.placid.app/ext/webhooks/project/token);
output.inspect("Image generation started 🥳");
End result
Now we can run our Airtable action! Once it's finished, there should be:
- Image metadata in the Orientation and Aspect Ratio fields
- 4 generated images in the Placid Image field – each using a different template
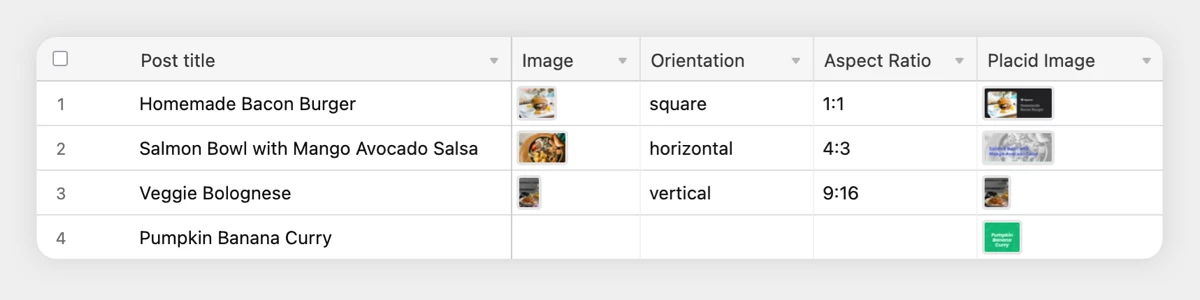
Thanks to our filter settings and image metadata, each of our Placid actions ran only once. Super efficient: You only spend Placid credits for generated images you really need.
What's next?
This workflow is already pretty nice, but the metadata info we have now can be used for a lot more scenarios. We did for example not create a filter using the aspect ratio information in this tutorial: You could use it to set up even more exact filter rules.
Get creative and use this script to power custom image generations to create mockups for posters and other print products in standardized sizes, eCommerce ads for differently sized product shots and more.
If you have an idea for a custom workflow and need help setting it up,