


Creating something from nothing: This is how this video generation workflow feels like!
In this tutorial, we're going to automatically create real estate promo videos using a dynamic video template (Placid), AI-generated videos from static photos (Runway), a database (Airtable) and a nocode workflow automation (Make).
What we are going to create
Our workflow will take a static photo and some text content from an Airtable dataset, automatically generate a short, branded video, and send it back to Airtable.
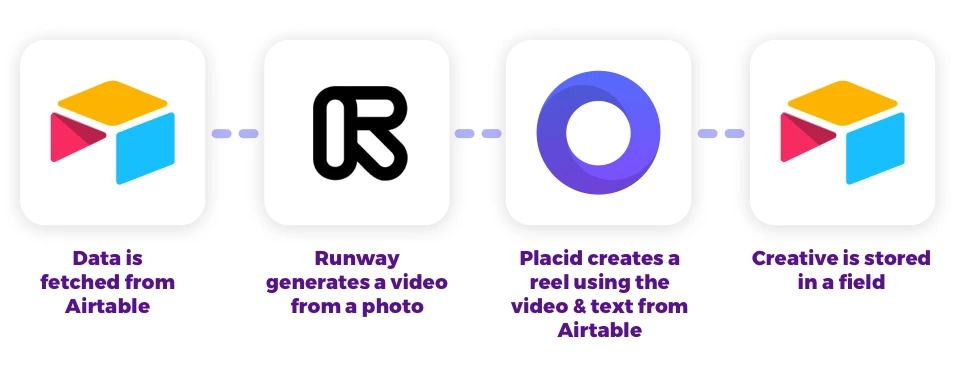
We're going to use an AI model by Runway to turn a static photo of a room into a room-tour like view, zooming into the photo a bit. The end result will look like this, using a dynamic Placid template with some subtle animations for our video:
To follow along, you will need accounts for Make, Airtable, Runway, and Placid. For Runway and Placid, some credits are needed to run this workflow.
Set up a Placid project
First, we need to set up a placid.app project to prepare the template for our creative generation.
Add the Make integration to an existing Placid project in the project settings, or create a new one under Projects > Add new project.

Create your video template
In the Templates tab of your project, you can now add a new template and create our design for the video. Placid templates contain 🔄 dynamic layers that can be filled with data from our Airtable later to generate images, videos or PDFs.
I started with an empty canvas in a story format (1080x1900) and added some design elements:
- A full-size picture element in the background:
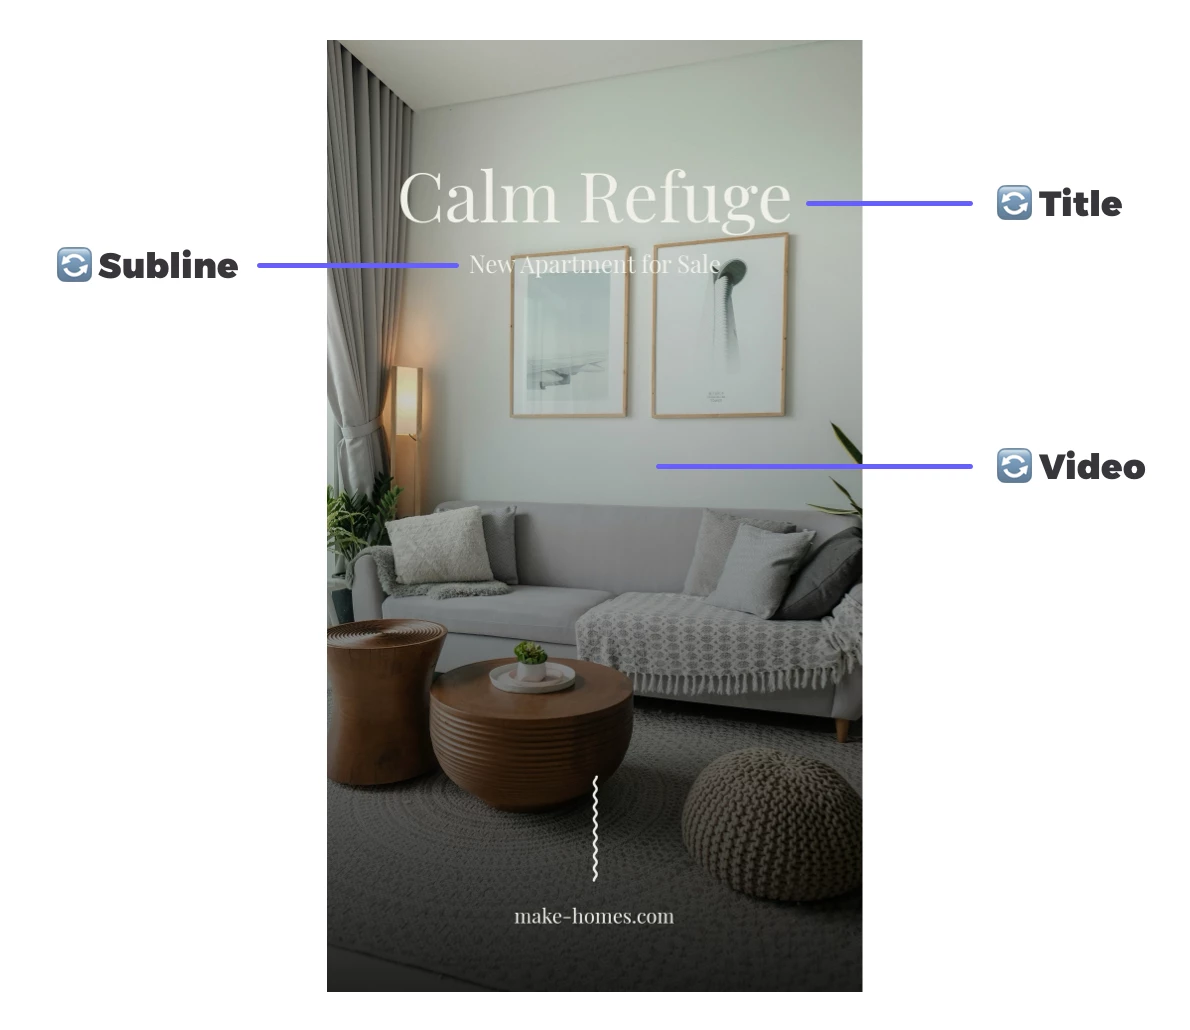
imageis the layer that will be filled with our generated real estate video clip. - The
overlaylayer is a rectangle with an opaque gradient filling right above the image. It tones down the video a bit and makes the text above more legible. - Text layers for the
title, thesublineandurl. - A squiggly line – the shape layer
linefilled with an SVG graphic - as a design element
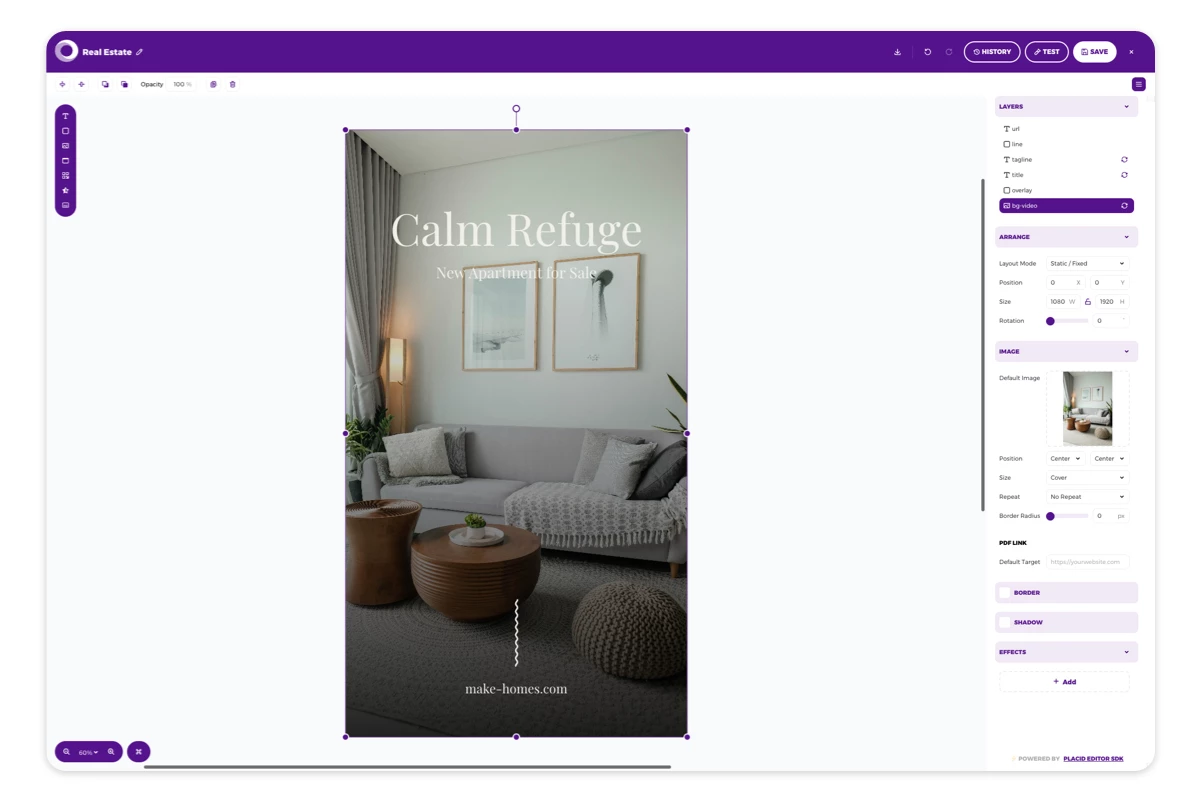
We're going to fill in content from our Airtable into the dynamic layers image, title and subline later. Make sure you give these layers meaningful names: That makes it easier when we're referencing them in our Make scenario later!
Optional: Add animations
To make our visual more sophisticated, we're going to add some subtle animations.
To add animations, go to the animation settings (Video settings > Configure animations). You will get some suggestions for effects like fades and slides. These are usually a nice starting point, but you can also start from scratch.
For our result, I played around with custom settings:
imagedid not get any animations – we're going to fill it with a video anyway!overlay: Fade in, slow duration setting, no easing, 0 ms delaytitle: Slide in down, 2200 ms duration, ease out, 0 ms delaysubline: Slide in down, 2200 ms duration, ease out, 60 ms delayline: Fade in, 2000 ms duration, ease out, 2200 ms delayurl: Fade in, 2000 ms duration, ease out, 2400 ms delay
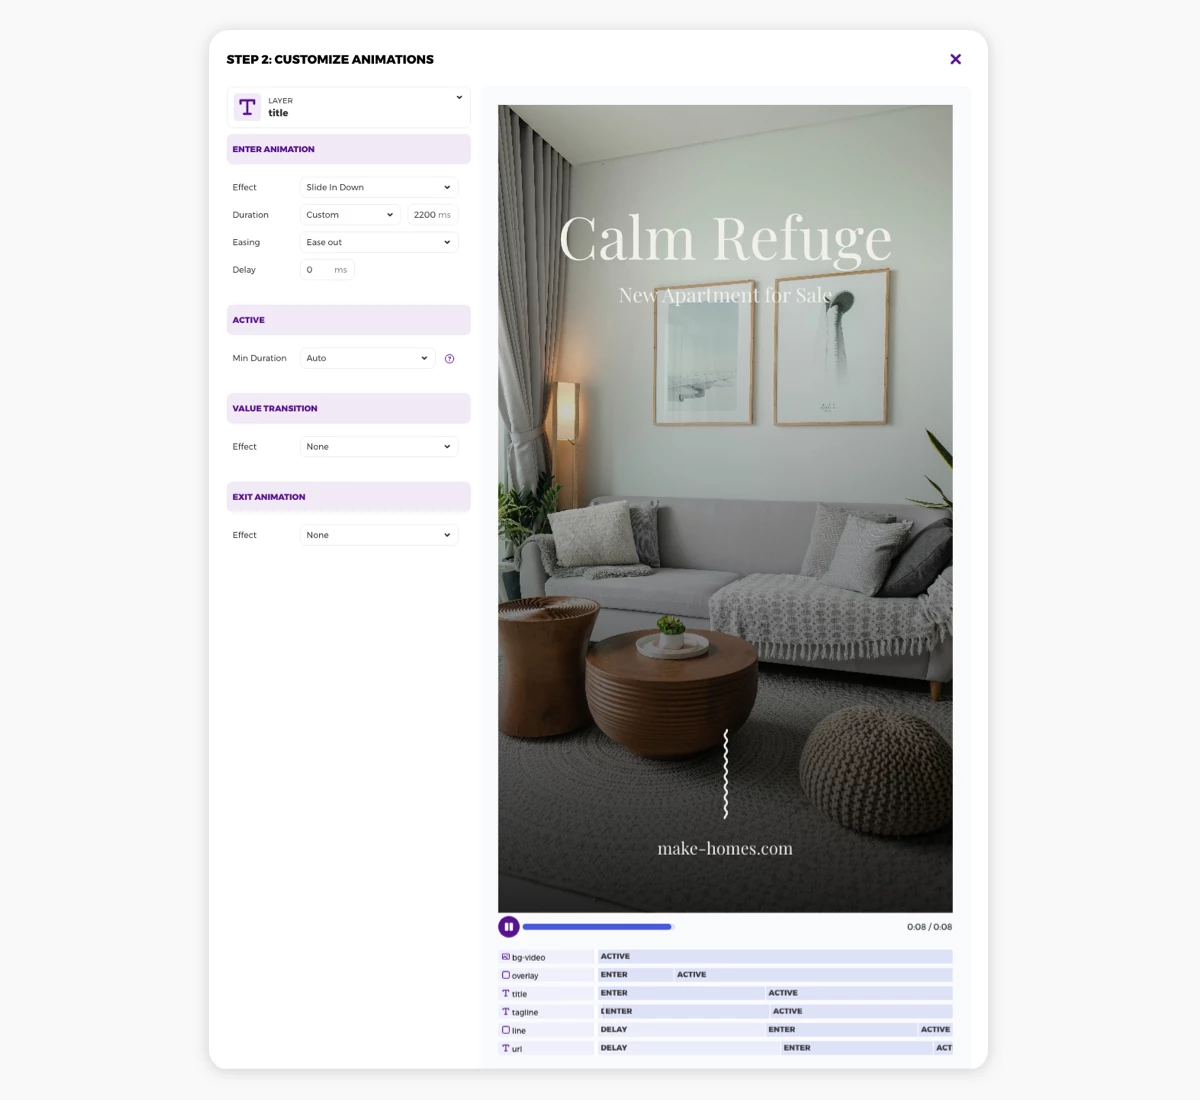
The slight staggering and the long durations make for a soft entrance of the layers. The slide in effect makes the headline an eye-catcher.
Set up your data in Airtable
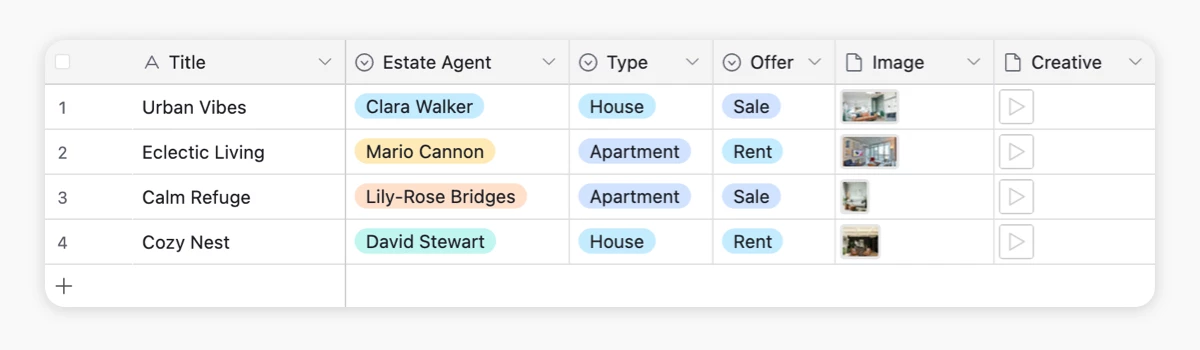
The data for our videos is living in an Airtable database.
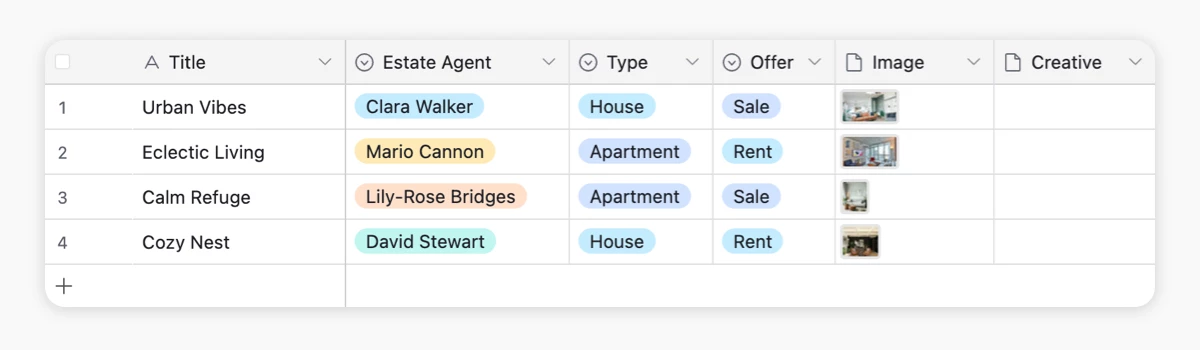
Our example database contains a text field for our Title, single select fields with options for the Type of estate object (house, apartment) and Offer (for sale, for rent), and a static Image field. I added another image field called Creative where we are going to save our generated video at the end of our workflow.
Set up your Make workflow
Now let's connect all our tools in our nocode workflow with Make! This is how it's going to look like in the end:

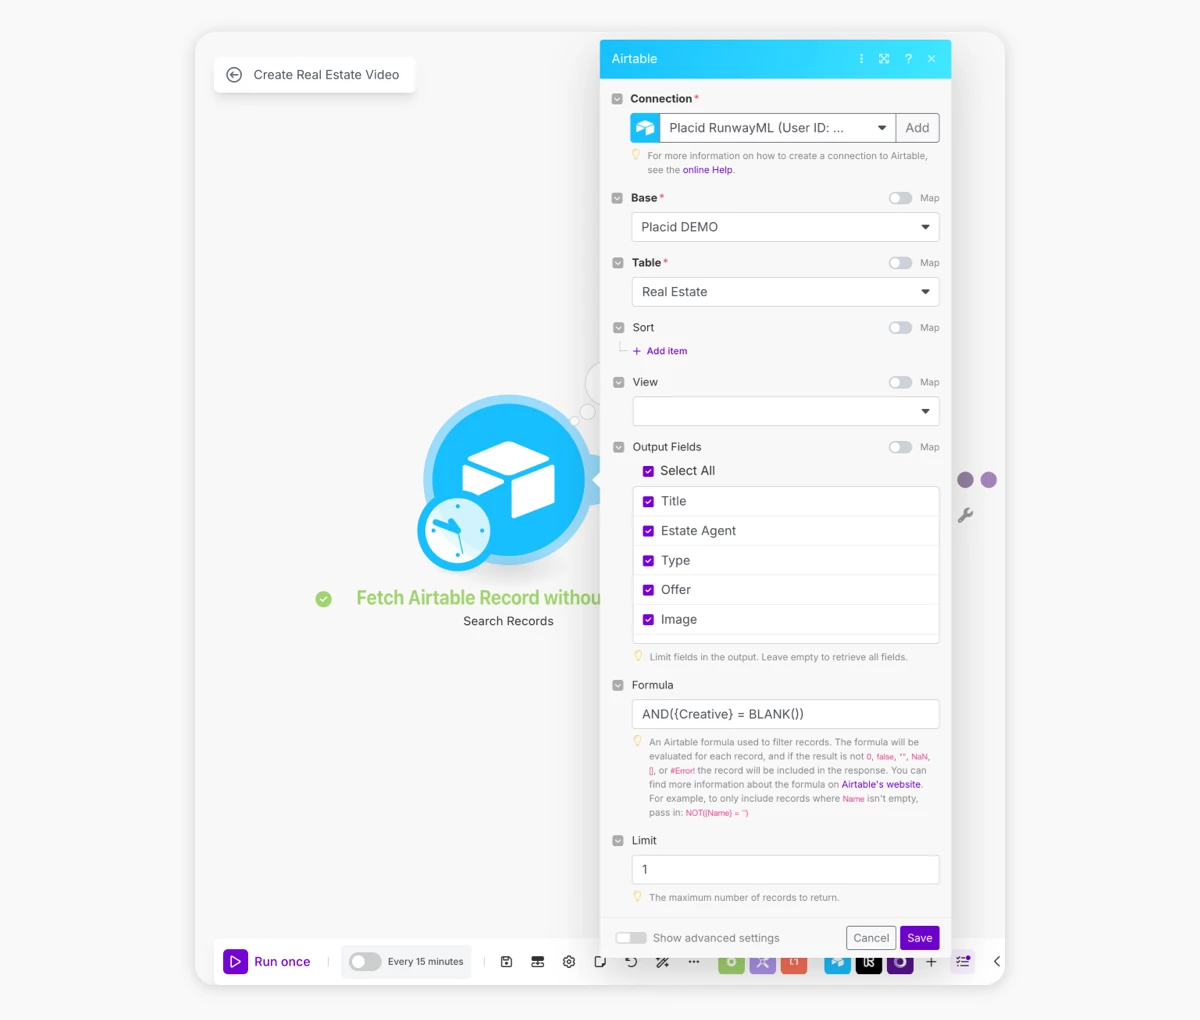
Step 1: Get Airtable records
Create a new scenario and start with a Search Records Airtable action. Connect to the Airtable base and table in which you prepared the data.
Select all the fields you need for your workflow. In our case, this is are the Title, Type, Offer and Image. I also added the formula AND({Creative} = BLANK()) to filter out records that already have a generated video in the Creative field. This prevents our workflow to run multiple times unnecessarily.
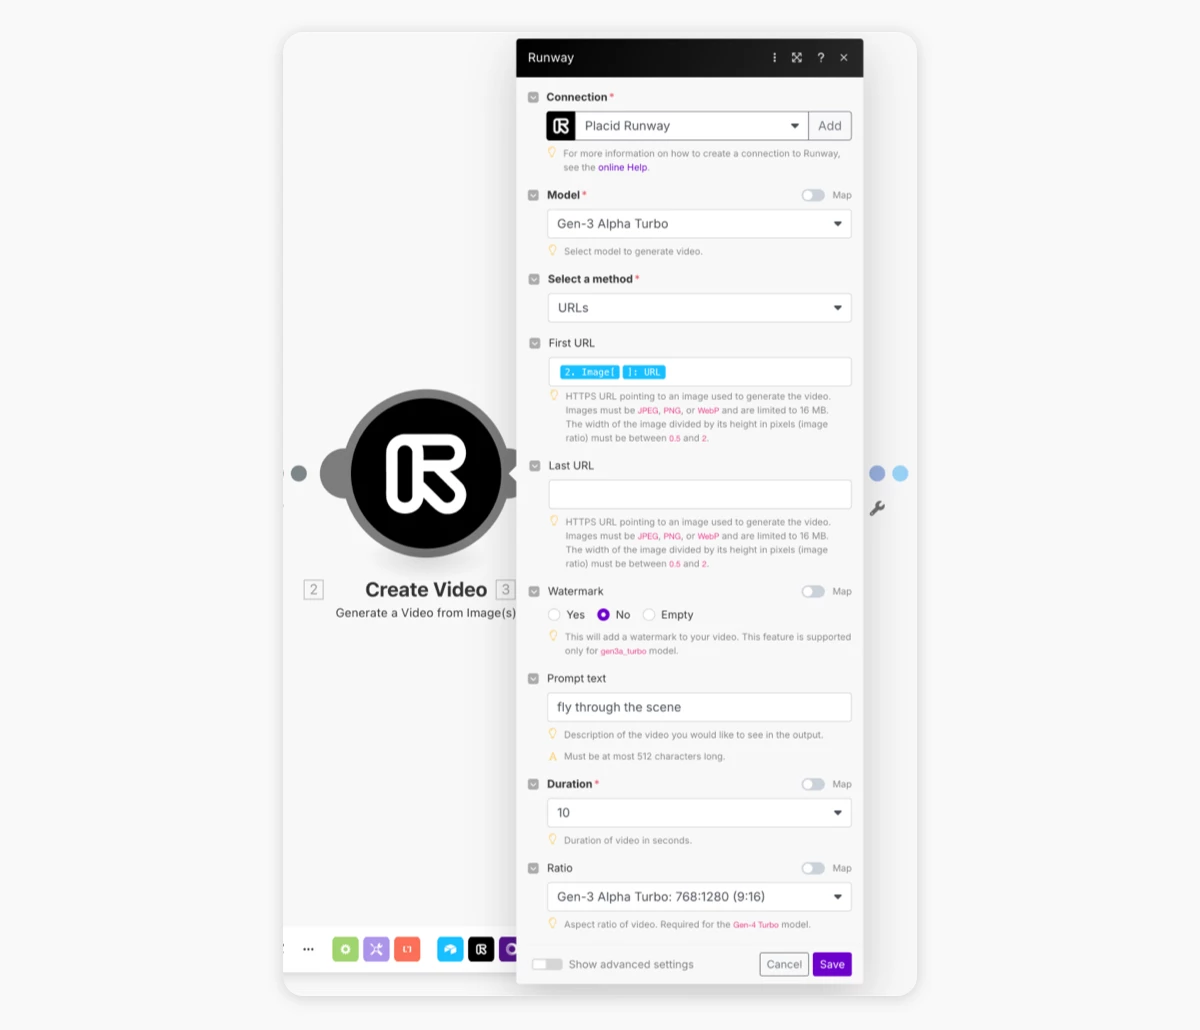
Step 2: Generate video from image with Runway
As a second step, we're adding a Generate a Video from Image(s) action by Runway.
- Connect your account
- Choose the model you want to use: I used the Gen-3 Alpha Turbo model.
- Choose the URL method and use the image URL from the Airtable Image field we fetched earlier as the
First URL - Write a prompt text: I used the very simple prompt
fly through the sceneto let Runway generate a walk-through-like video from our real estate photo; It worked well for me, but you can tweak the prompt to add some more instructions - Set your desired duration of the video (I used 10 seconds)
- Choose your desired aspect ratio: I used a 9:16 ratio, as this fits the story format of our video template
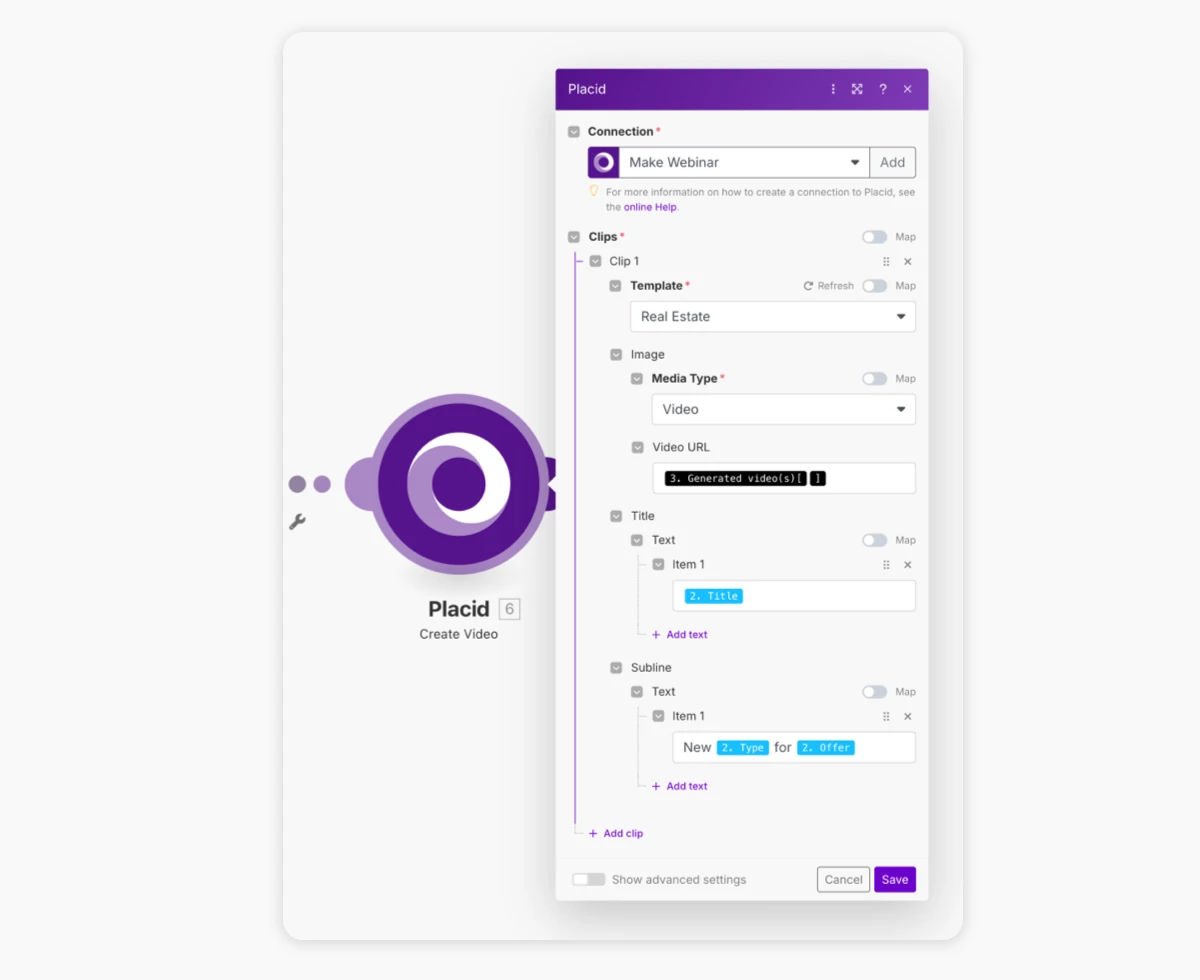
Step 3: Generate branded video with Placid
The next step is a Create Video action by Placid. Connect to Placid first, using your project's API token. You can find it in the API Token tab in your Placid project, or by clicking the Integrate button on your template.
These are the settings of the action:
- Add a clip to the video we're going to generate (theoretically, you could stitch together multiple video clips generated by Placid – but today we're only creating one single clip!)
- Choose the template you have created for this workflow. Mine is called
Real Estate. Once you selected a template, the settings for customizing its dynamic layers will appear. - Set the media type of the
imagelayer toVideo, and map the generated video from the Runway step to theVideo URL. - Map the Title field from the Airtable step to the
titlelayer's text - For the
sublinelayer, we're combining the content from the Type and Offer Airtable fields, writing "NewTypeforOffer" into the text field. This will output lines like "New Apartment for Rent" or "New House for Sale".
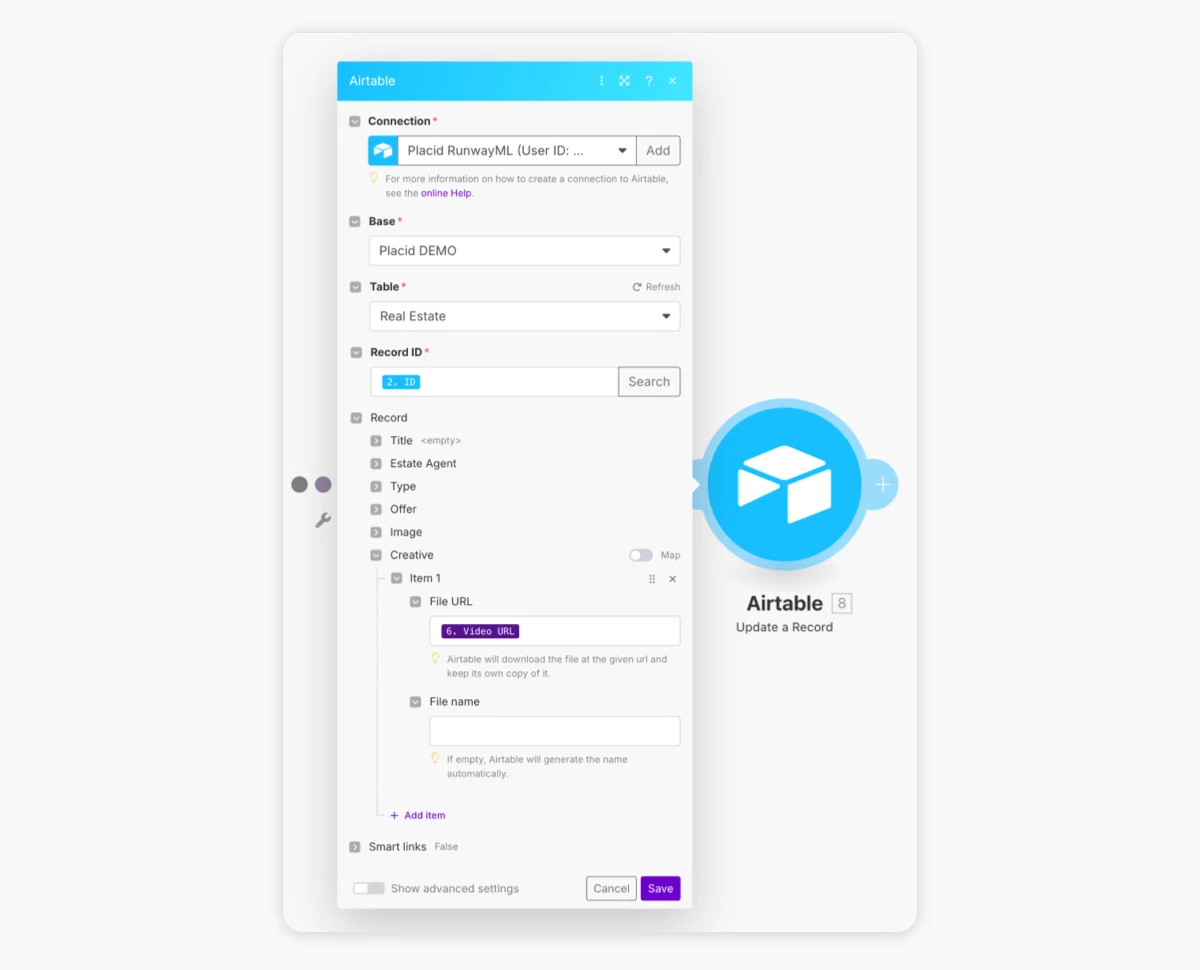
Step 4: Save video to Airtable
Now we're saving the generated Placid video back into the Creative field in Airtable. Add an Update a Record Airtable action to the scenario and connect to the same Base and Table.
Fill in the ID data from the first Airtable scenario step into the Record ID field (so it will run through all of the records we fetched).
Add the Placid Video URL data into the File URL of the Airtable field Creative.
Test your workflow
Now that the setup is complete, we're going to test our video generation workflow! Click the Run Once button in your Make scenario to start it.
While the scenario is running, you can watch the videos appear in the Creative field of your Airtable one by one. Once it's finished, all rows should contain one.
You can now use the generated videos as reels or send them to your customers. Or what about expanding the workflow to automatically send videos of suitable objects directly to your customers?
Next steps
You can expand and adapt this workflow with your own ideas:
- Add some personalization to create custom video offers for your customers
- Reuse the videos as an intro to a guided room tour that goes more into depth
- Adapt it to another use case, if real estate isn't your industry
You can also check out our other tutorials for workflows that turn static content into videos:
- How to create a slideshow video from static photos - a workflow using multiple photos
- How to turn static photos into video content for social media - a tutorial that does not use a workflow automation tool like Make or Zapier, and instead lets you create a small video generation tool within Placid that can easily be used by non-technical colleagues
We originally developed this workflow together with the Make team for their webinar on the Top 3 AI Automation Trends for 2025. You can watch it on Youtube for some more ideas!
If you want to start creating your own workflows and need some support,