


Adding social sharing to your apps can drive virality and organic growth. It's always best to make it as easy as possible for users to share their accomplishments and (self-created) content directly from within our apps. That way, one user might bring you two more without having to spend any $ on ads.
About this tutorial
We want to help you as app devs & designers to implement fancy and flexible social sharing: In this article, I'm going to show you how to generate dynamic share images from (easy to design) templates in Swift with the Placid iOS SDK.
What the Placid mobile integration offers:
- On-device generation of personalized images from templates
- Custom template designs
- A drag & drop template editor
- Dynamic content layers with auto-resizing for text and images
- A collection of preset designs
- Easy implementation
The setup takes only a few minutes, and you'll be able to generate unlimited images (offline and directly on-device, no API calls needed).
Alternative: Create share images using UIViews rendered as UIImages
Of course I'm a bit partial to our SDK 🙃 but if you prefer a self-coded solution, you would need to code custom UIViews with the layouts of your share image designs, and then render them as a UIImage.
extension UIView {
   func asImage() -> UIImage {
       let renderer = UIGraphicsImageRenderer(bounds: bounds)
       return renderer.image { rendererContext in
           layer.render(in: rendererContext.cgContext)
       }
   }
}
let shareImage = containerView.asImage()From our experience, it's often a relatively big effort to recreate elaborate designs for share screens via code.
Also, all changes and new layouts have to go through development, stopping the design & marketing team from trying out new things for social sharing (e.g. special designs for different campaigns, seasons or events).
Having a drag & drop editor to adapt or create new designs makes your app's social integration a lot more flexible and saves a lot of implementation time!
What we're going to build: Share images for a fitness app
In this tutorial, we're going to create share images for our imaginary fitness app Fitletics.
Our app lets users set up their fitness routines and accompanies & logs their workouts: It records the exercises and weight lifted, calories burned, duration of the workout and the heartrate as reported by their Apple Watch to display stats and progressions.
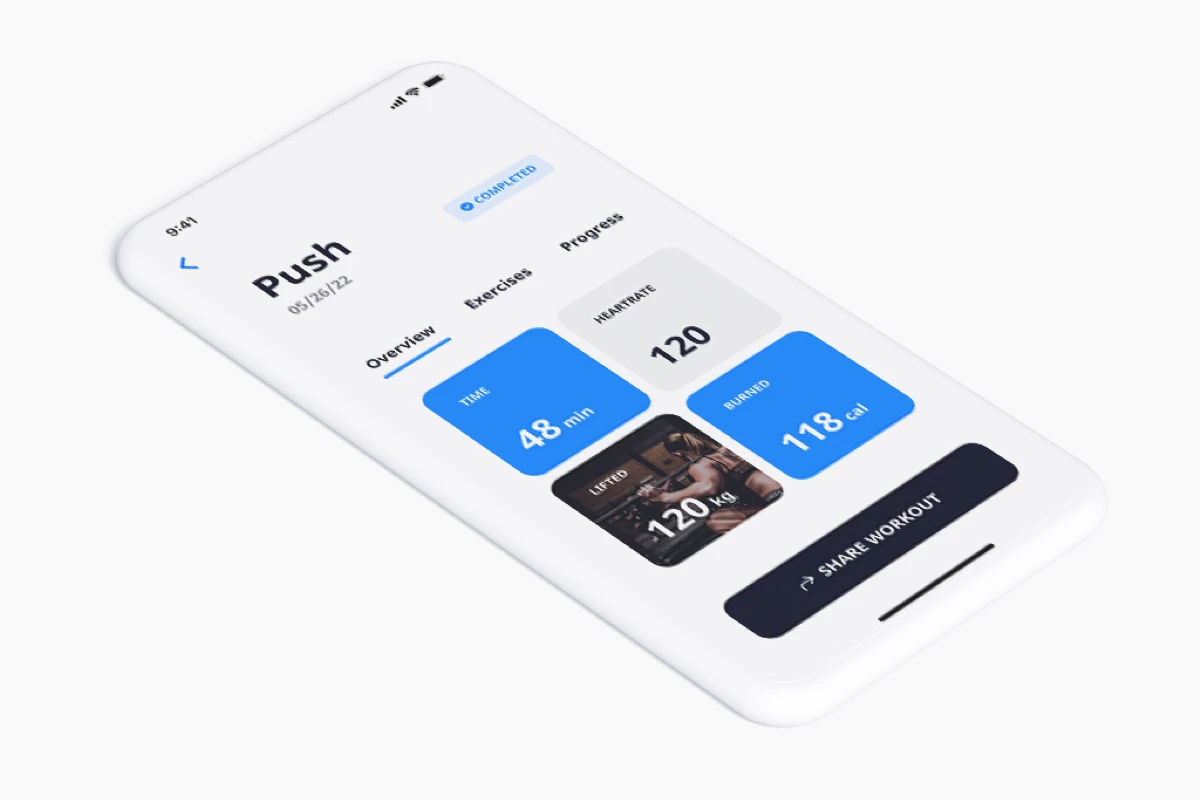
Targeted at experienced weight lifters, Fitletics wants to be the go-to choice of fitness companion apps. To help achieve that goal we're going to implement auto-generated images summarizing every completed workout, ready to be shared in the user's Instagram stories.
Ideally, they will want to show off their discipline to their followers: Doing heavy workouts multiple times a week is something to be proud of. We make it easy for them to look good after every workout, and they spread the word about our app every time. Win win!
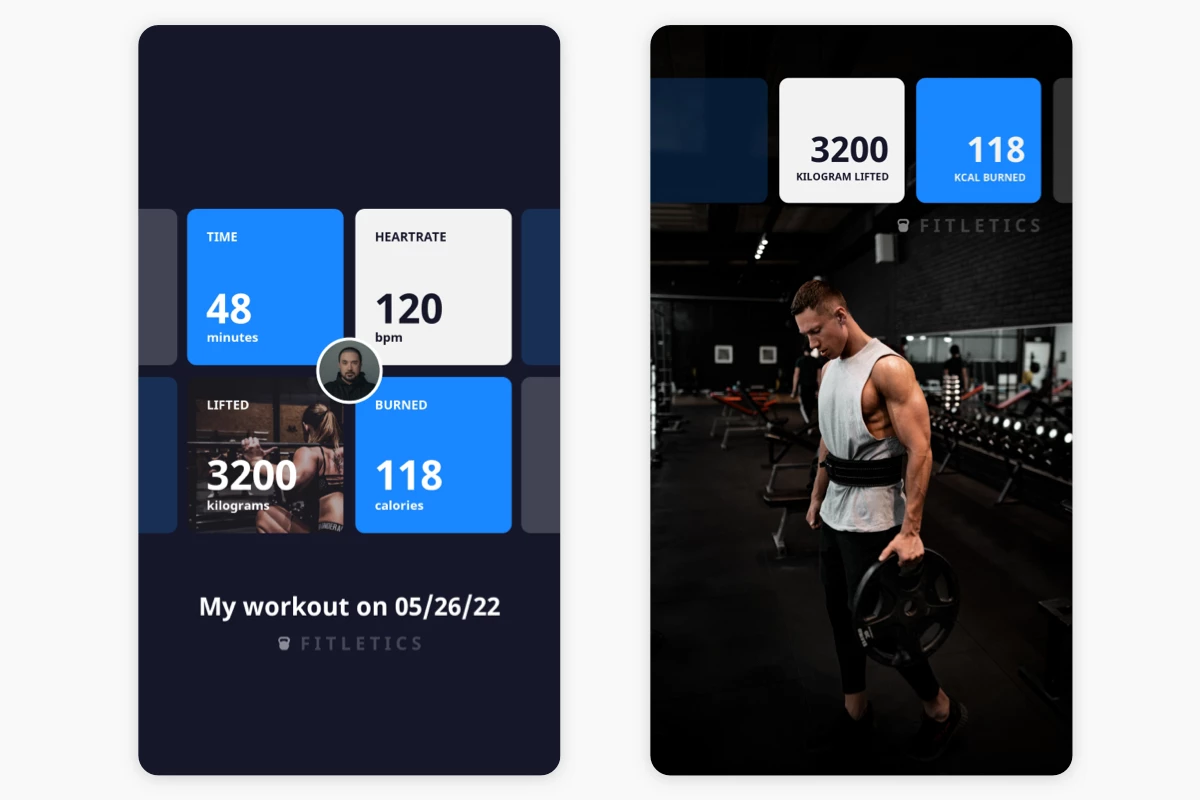
To support sharing workouts often, we'll be creating images to share via stories. We want to use two different templates our users can choose from: One of them should focus on workout stats only, and the other should show off a gym selfie as well.
What you need
If you want to follow along the tutorial, you will need a Placid account – you can sign up for free. I'll also assume you already have an Xcode project set up to test in. (We'll not create the actual share screen UI in this tutorial, but focus on the images and social sharing!)
Set up a Placid project
In Placid, we first have to create a new project. We'll add a mobile integration to be able to use the Placid iOS SDK for image generation.
If you prefer to use an existing Placid project, you can add a mobile integration to it in the project settings.
Create templates
Then, we'll create Placid templates with the designs of our share images. This is the fun part for designers! For developers, we offer some preset designs 😉 or you can hand this off to your design team.
We'll add two new templates in our Placid project in the Templates menu, choosing the Story size (use the preset size or set the canvas to 1080x1920).
Using the drag & drop editor, we're creating dynamic text and image layers for the values we're going to personalize later: the user's profile pic or selfie, and the values for workout time, average heartrate, kilograms lifted and calories burned.
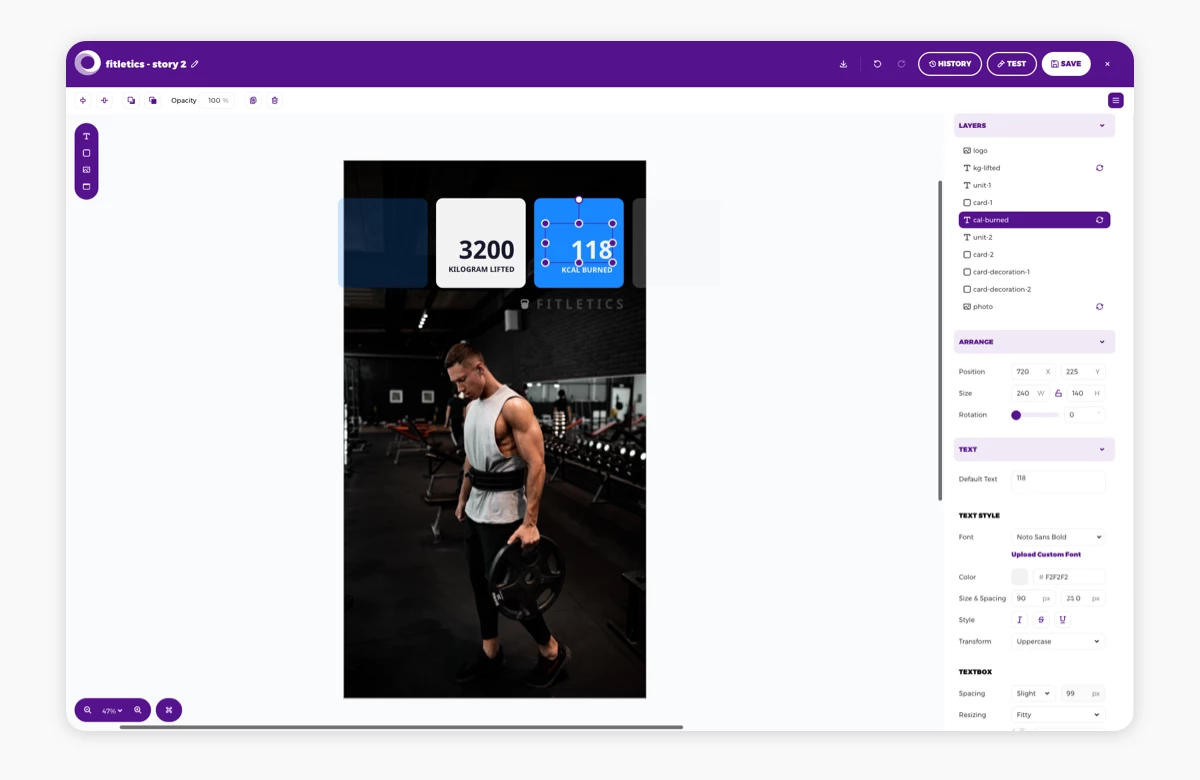
The text and images we use in the template are used as default values that will be replaced later. It's always good to use realistic values to test how they are going to look in the layout you're designing.
The layer names are going to be used later to identify and fill them via code, so use titles that make sense to you. By default, all layers are dynamic - but you can switch layers like the logo or design elements like cards to static using the 🔄 symbol in the layer list.
Get your (demo) SDK license
Next, we're going to add a (demo) Mobile SDK license to our Placid project to be able to download and package the templates in our app for on-device image generation.
Go to the project settings and switch to the Mobile tab in the Integration settings panel. There, you can add a demo license for testing (or a full license if you already have a Placid subscription).
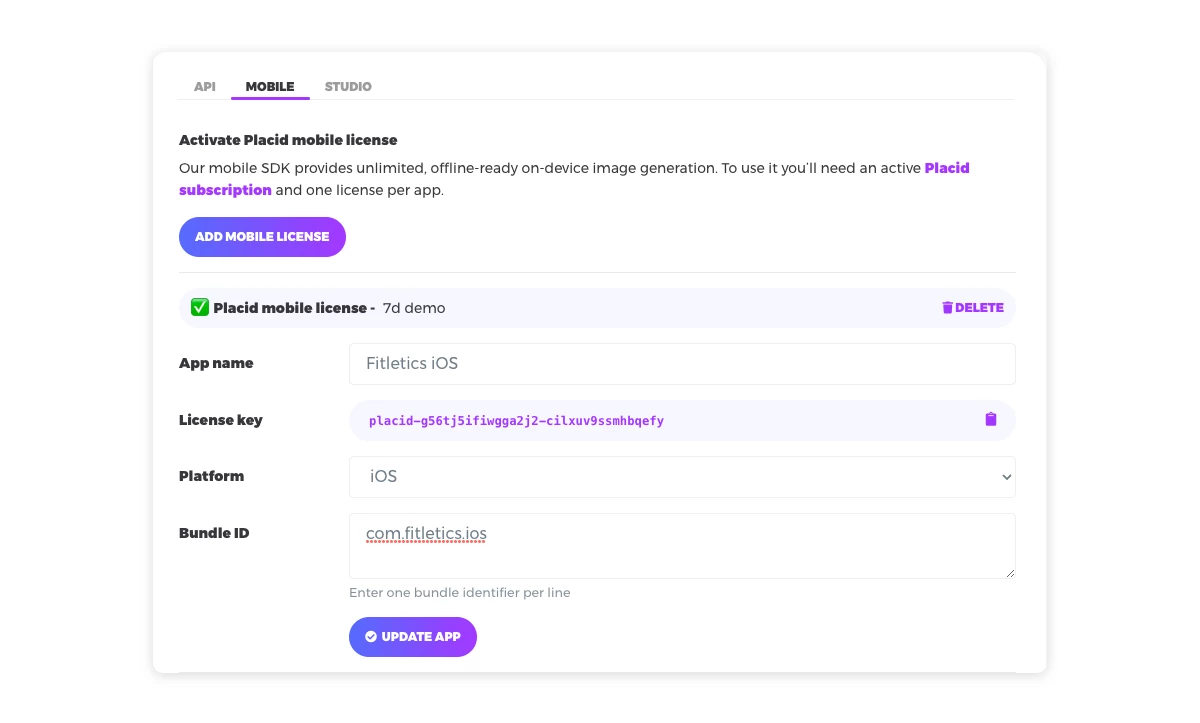
Keep your license key handy for the configuration of the SDK in a few minutes!
Download your templates
Back in the Templates menu, we're using the Integrate button of any of our templates to configure a downloadable template package that we'll use with the SDK later.
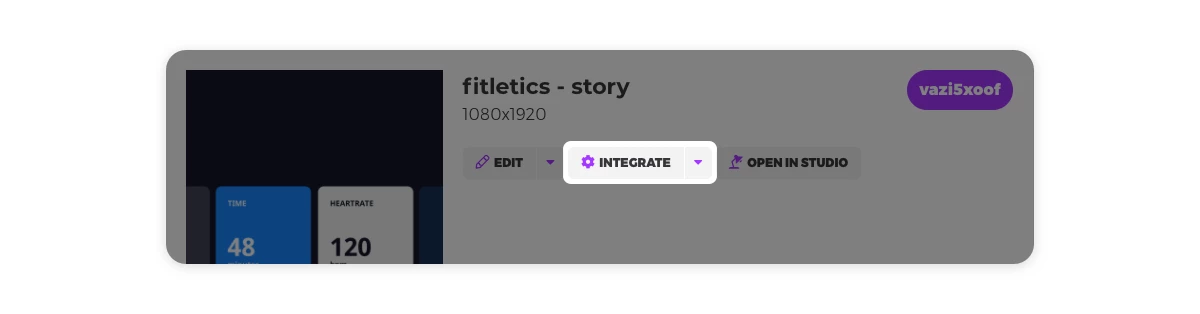
In our case, we'll choose the two templates we just designed.
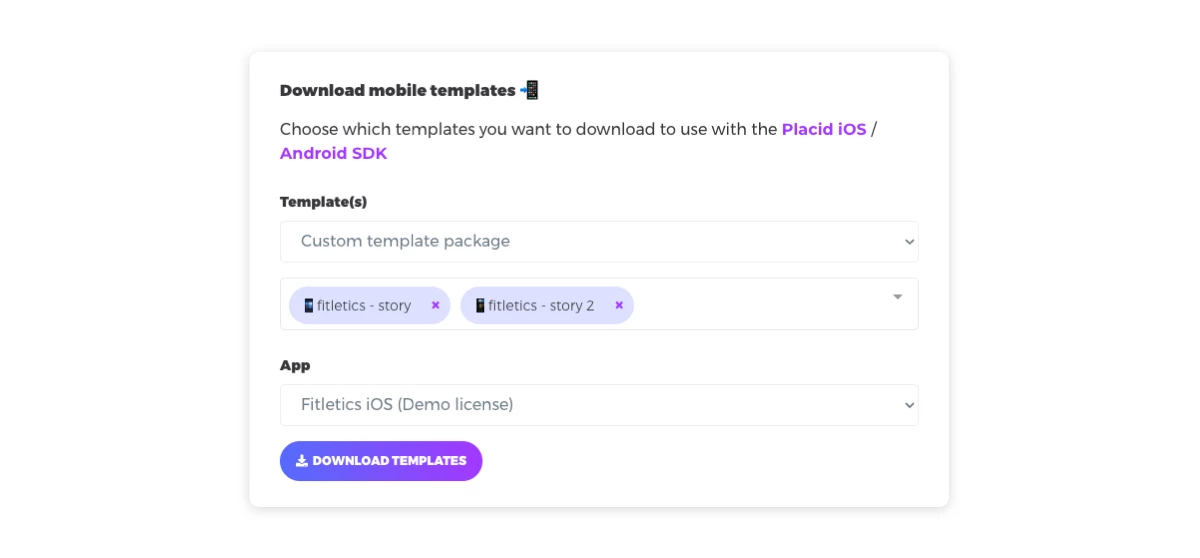
There's an interactive code demo in the Integrate dialogue as well, so you can explore how template modifications are done in Swift. You can play around a bit to get a feeling for the functionality, or switch right into your Xcode project now.
Integrate the Placid iOS SDK
First, copy the template package to a project directory of your choosing.
Then we're going to integrate the Placid iOS SDK into your project. You can do that either manually, or use the Swift package manager, CocoaPods or Carthage. You can find the detailed installation instructions in the SDK repo on Github.
Configure the SDK with the path to your templates and the license key from your project settings.
func application(_ application: UIApplication, didFinishLaunchingWithOptions launchOptions: [UIApplication.LaunchOptionsKey: Any]?) -> Bool {
    do {
        try PlacidSDK.configure(withLicenseKey: "placid-g56tj5ifiwgga2j2-cilxuv9ssmhbqefy", templateURL: Bundle.main.url(forResource: "templates", withExtension: "placid"))
    } catch {
        print(error.localizedDescription)
    }
}
Generate images from Placid templates in Swift
In the next steps we're going to call one of our templates and generate an image with custom values from it.
Retrieve and preload your template
Find the IDs of your template in the Template menu in your Placid project to retrieve it. For faster rendering, we recommend preloading them.
let storyTemplateStats = PlacidSDK.template(withIdentifier: "vazi5xoof")
storyTemplateStats.preload();

let storyTemplateSelfie = PlacidSDK.template(withIdentifier: "mklwbrwiq")
storyTemplateSelfie.preload();
Modify your layer data
Now we're ready to fill our data into the dynamic layers of our templates to render a personalized images for our users.
To our stats-focused template we'll add some statistics from the user's workout, their profile pic and the title of the image including the current date.
To do so, we have to call the dynamic layers of our template and use their properties to modify them. In our example, we're only changing their content (text and image URLs), but Placid also offers customization of colors, borders, visibility and more. You can find all properties in our API documentation!
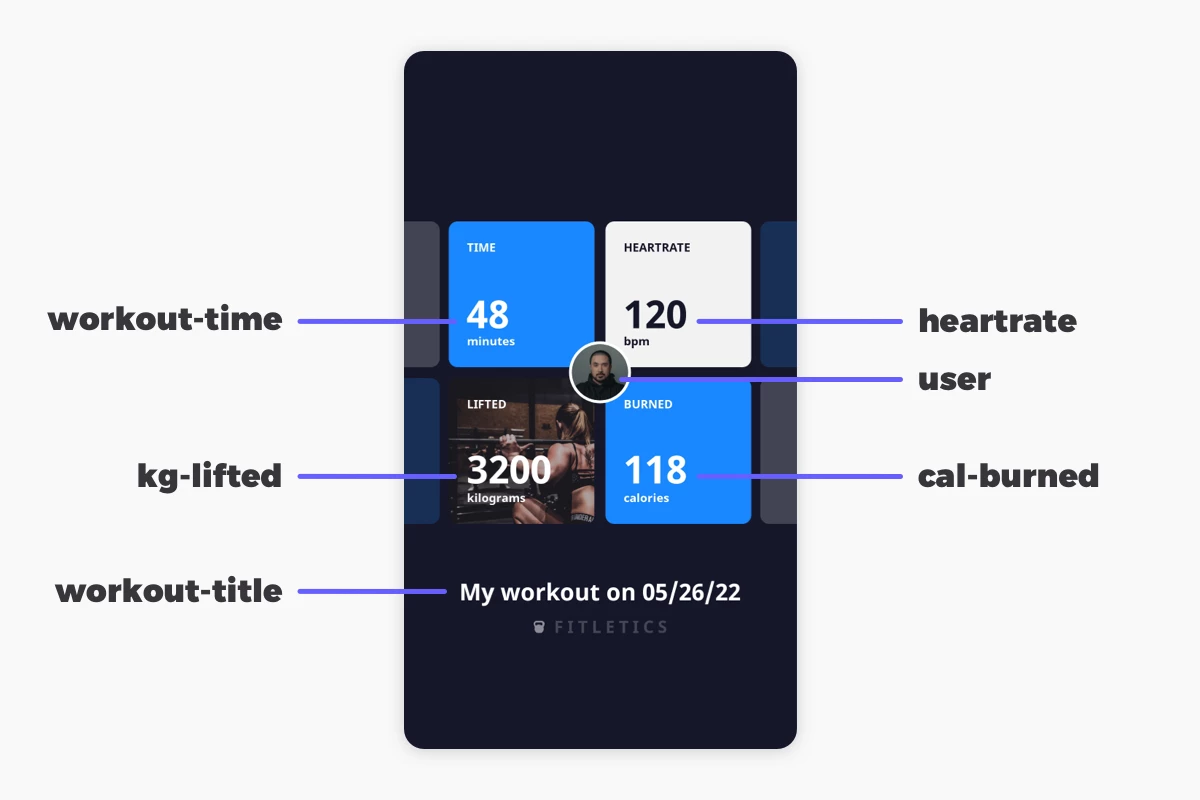
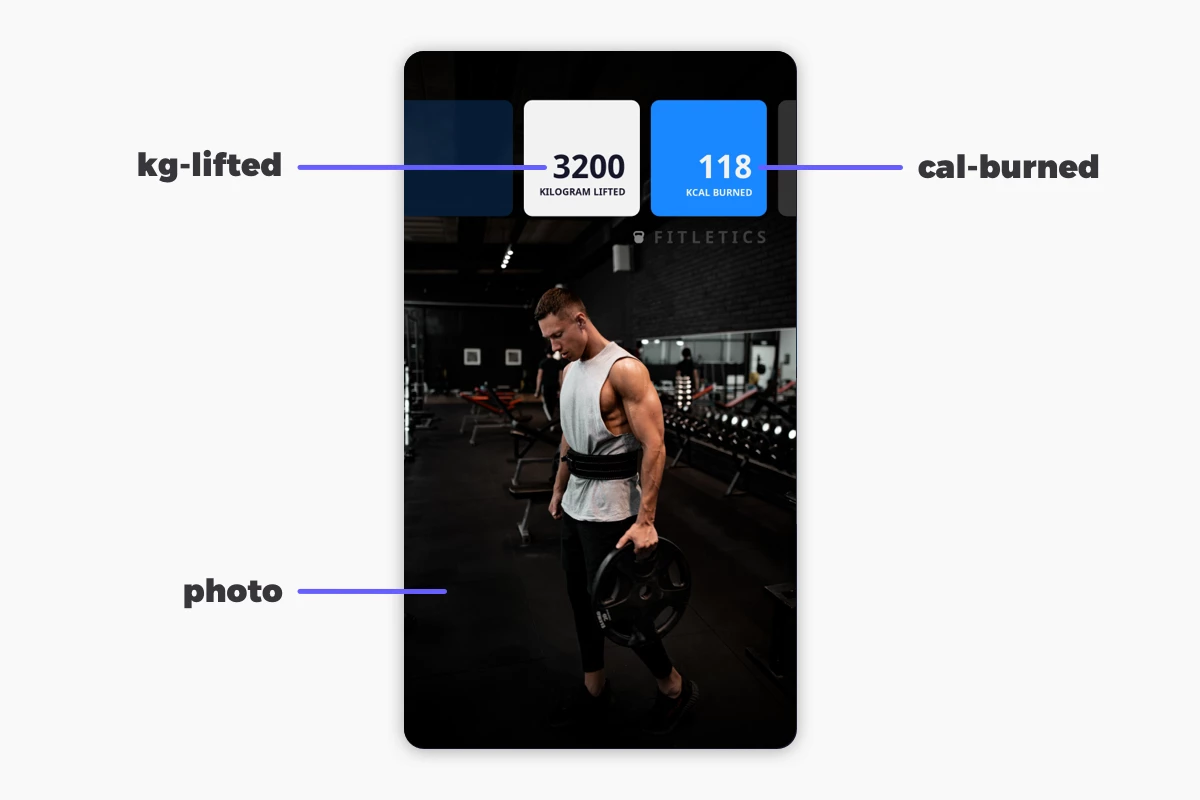
let textWorkoutTime = storyTemplateStats.textLayer(named: "workout-time")
textWorkoutTime.text = "48"

let textHeartrate = storyTemplateStats.textLayer(named: "heartrate")
textHeartrate.text = "100"

let textKgLifted = storyTemplateStats.textLayer(named: "kg-lifted")
textKgLifted.text = "3200"

let textCalBurned = storyTemplateStats.textLayer(named: "cal-burned")
textCalBurned.text = "118"

let imgProfile = storyTemplateStats.pictureLayer(named: "user")
imgProfile.imageURL =  URL(string: "https://yoururl.com/users/19294/profile.jpg")

let textTitle = storyTemplateStats.textLayer(named: "workout-title")
textTitle.text = "My workout on 05/26/22"
These values are static examples – you would of course use your own variables containing user data here. Our second template with the selfie would be filled in a similar way, reusing some of the data.
let textKgLifted = storyTemplateSelfie.textLayer(named: "kg-lifted")
textKgLifted.text = "3200"

let textCalBurned = storyTemplateSelfie.textLayer(named: "cal-burned")
textCalBurned.text = "118"

let imgSelfie = storyTemplateSelfie.pictureLayer(named: "photo")
imgSelfie.image =  photo // example variable containing an UIImage, picked from the user's library or taken via camera
Render images
Once you have filled the layers with your values, you're ready for rendering.
let placidImageStats = await storyTemplateStats.renderImage()
let placidImageSelfie = await storyTemplateSelfie.renderImage()
And we're done! Your generated images are now ready to be used for social sharing.
Share images to Instagram Stories
How exactly your share UI works is up to you: You can for example let your users choose between different share image templates or present them a random one each time.
We're not going to code up any UI today, but to complete the workflow of sharing, I'll walk you through one last code example showing you how to implement a "Share as Insta story" functionality using rich URL schemes for Instagram Stories.
func shareImageAsInstaStory(placidImageStats: UIImage) {
    guard let storiesUrl = URL(string: "instagram-stories://share"), let shareImage: Data = placidImageStats.pngData() else {
        return
    }

    if UIApplication.shared.canOpenURL(storiesUrl) {
        let items = [["com.instagram.sharedSticker.backgroundImage": shareImage]]
        UIPasteboard.general.setItems(items)
        UIApplication.shared.open(storiesUrl)
    } else {
        // handle cases where the Instagram app is not installed or couldn't be opened
    }
}
Within this snippet, we have created a URL for story sharing with Instagram's URL schemes. Then, we checked if the client can open Instagram (is it installed?). If yes, we're converting our UIImage to a PNG, copy it to the system pasteboard and open the share URL.
This code snippet would take the generated image with the user's workout stats and open it in the Instagram story composer.
What's next?
Now that you have the "how" figured out, you can get creative with social sharing!
- Have you taken a look at the customization options for sharing via Instagram Stories? You could for example share an Insta story with a personalized sticker that can be freely resized 👀
- Create templates in different dimensions to share on other platforms. Facebook, Twitter, LinkedIn, messengers – everywhere your users are!
You can use Placid for any image you need generated – on mobile, but also via our API or other nocode solutions. Give it a try ✌️